VS2015使用NUnit 3.0進行測試 - 2016新年快樂
前一篇「使用VS2015建立單元測試專案」介紹VS2015的單元測試(Unit Test)建立與NUnit 2.6.x的使用方式。而NUnit 3在2015/11/16終於release了。這一篇是說要說明Visual Studio 2015與NUnit 3的整合使用方式。
Visual Studio Test Adapter for NUnit 3.0
要讓Visual Studio 2012/2013/2015的測試總管支援執行NUnit 3.0版必須安裝Visual Studio Test Adapter for NUnit 3.0擴充功能,需要注意,Visual Studio Test Adapter僅支援NUnit 3.0版,2.x版請參考前一篇套件與設置方式。
NUnit Templates for Visual Studio
接下來還有第二個NUnit Templates for Visual Studio擴充功能需要安裝,它提供Visual Studio新增NUnit 3.0測試專案的功能。它提供了同時提供Desktop - C#/VB、Xamarin - Android/iOS/UWP/WP8.1專案類別的支援能力。還能看到 VB 的身影,好感動。
NUnit 3.0初體驗
以下就用一個最簡單的加法計算器來進行NUnit 3.0初體驗。
唯一注意是選擇NUnit(表示使用NUnit 3.0)不是NUnit2。
看一下範本所加入的組件,還是使用 beta 版本,讓我們升級至為 release 版本。
    [TestFixture()]
    public class CalculatorTests
    {
        [Test()]
        public void Add_整數5加5_得整數10()
        {
            var first = 5;
            var second = 5;
            var expected = 10;

            var target = new Calculator();
            var actual = target.Add(first, second);

            Assert.AreEqual(expected, actual);
        }

        [Test()]
        public void Add_浮點5點4加5點4_得浮點10點9()
        {
            var first = 5.4;
            var second = 5.4;
            var expected = 10.8;

            var target = new Calculator();
            var actual = target.Add(first, second);

            Assert.AreEqual(expected, actual);
        }
    }
我是故意不附上Calculator實作程式碼,你能發現,有了清楚的測試程式碼,就算你沒有原始程式碼也能清楚知道原始程式碼在做什麼事。
SpecFlow與NUnit 3.0
上一小節透過Visual Studio Test Adapter與NUnit Templates for Visual Studio擴充功能的幫忙,已經可以在Visual Studio順利透過NUnit 3.0進行單元測試。但如果讀者是TDD或BDD的開發者,那麼會關心的NUnit 3.0是否能在SpecFlow中使用?
讓我們以SpecFlow進行Calculator的測試案例。
Feature: 透過Calculator類別進行數值計算
 In order to 進行Add運算
 As a Calculator呼叫者
 I want to 驗證兩個數值Add()後的回傳的總數

@Calculator
Scenario: 兩個正整數相加
 Given 我輸入第一個整數5到計算機
 And 我輸入第二個整數5到計算機
 When 呼叫Calculator的Add的int多載方法
 Then 應該得到整數結果為10

Scenario: 兩個浮點數相加
 Given 我輸入第一個浮點數5.4到計算機
 And 我輸入第二個浮點數5.4到計算機
 When 呼叫Calculator的Add的double多載方法
 Then 應該得到浮點數結果為10.8
先把.feature的Scenario的寫好,然後產生Step檔並撰寫測試程式碼:
using NUnit.Framework;
using System;
using TechTalk.SpecFlow;

namespace CalculatorTests
{
    [Binding]
    public class 透過Calculator類別進行數值計算Steps
    {
        Calculator.Calculator target;

        [BeforeScenario()]
        public void BeforeFeatureCalculator()
        {
            target = new Calculator.Calculator();
            ScenarioContext.Current.Clear();
        }

        [AfterScenario()]
        public void AfterFeatureCalculator()
        {
            ScenarioContext.Current.Clear();
        }

        [Given(@"我輸入第一個整數(.*)到計算機")]
        public void Given我輸入第一個整數到計算機(int p0)
        {
            ScenarioContext.Current.Add("first", p0);
        }

        [Given(@"我輸入第二個整數(.*)到計算機")]
        public void Given我輸入第二個整數到計算機(int p0)
        {
            ScenarioContext.Current.Add("second", p0);
        }

        [Given(@"我輸入第一個浮點數(.*)到計算機")]
        public void Given我輸入第一個浮點數到計算機(double p0)
        {
            ScenarioContext.Current.Add("first", p0);
        }

        [Given(@"我輸入第二個浮點數(.*)到計算機")]
        public void Given我輸入第二個浮點數到計算機(double p0)
        {
            ScenarioContext.Current.Add("second", p0);
        }

        [When(@"呼叫Calculator的Add的int多載方法")]
        public void When呼叫Calculator的Add的Int多載方法()
        {
            var first = (int)ScenarioContext.Current["first"];
            var second = (int)ScenarioContext.Current["second"];

            var result = target.Add(first, second);

            ScenarioContext.Current.Add("result", result);
        }

        [Then(@"應該得到整數結果為(.*)")]
        public void Then應該得到整數結果為(int p0)
        {
            var actual = p0;
            var expected = (int)ScenarioContext.Current["result"];

            Assert.AreEqual(expected, actual);
        }

        [When(@"呼叫Calculator的Add的double多載方法")]
        public void When呼叫Calculator的Add的Double多載方法()
        {
            var first = (double)ScenarioContext.Current["first"];
            var second = (double)ScenarioContext.Current["second"];

            var result = target.Add(first, second);

            ScenarioContext.Current.Add("result", result);
        }

        [Then(@"應該得到浮點數結果為(.*)")]
        public void Then應該得到浮點數結果為(double p0)
        {
            var actual = p0;
            var expected = (double)ScenarioContext.Current["result"];

            Assert.AreEqual(expected, actual);
        }

    }
}
第一行記得加入using NUnit.Framework;。還有App.config需要設置:
<specFlow>
  <!-- For additional details on SpecFlow configuration options see http://go.specflow.org/doc-config -->
  <unitTestProvider name="NUnit" />
</specFlow>
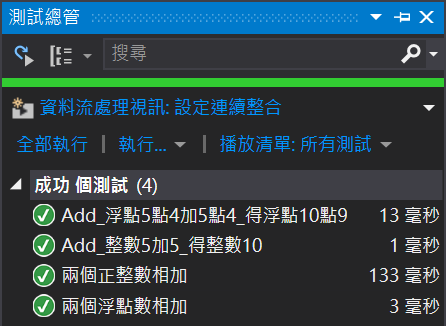
將unitTestProvider指定為NUnit。執行測試。
綠燈,SpecFlow與NUnit 3.0非常順利且無感就整合並執行測試案例。


沒有留言:
張貼留言
感謝您的留言,如果我的文章你喜歡或對你有幫助,按個「讚」或「分享」它,我會很高興的。